JupyterLab 部署
🎯 目标:在你的 Linux 服务器上装一个 JupyterLab,然后用内网云隧道把它暴露到公网——出门在外也能写代码!

🤔 这个教程适合谁?
- 你有一台 Linux 服务器(物理机、虚拟机、云服务器、树莓派……都行)
- 你想搞个 JupyterLab 写 Python、做数据分析、跑 Notebook
- 你想让这个 JupyterLab 内网公网都能用
- 你不想花钱买公网 IP(因为内网云帮你搞定)
预计耗时:20-30 分钟(手把手那种)
📋 你需要准备什么?
| 准备 | 说明 |
|---|---|
| 一台 Linux 服务器 | Debian/Ubuntu/CentOS 都行,推荐 Debian 12 |
| SSH 访问权限 | 能 ssh 到服务器就行 |
| 内网云隧道账号 | 没有的话去 内网云官网 注册一个 |
| root 或 sudo 权限 | 安装软件需要 |
第一步:安装 JupyterLab
💡 这一步就是给你的服务器装上一套交互式 Python 开发环境。
1.1 配置 pip 国内镜像(必做!)
国内访问 PyPI 官方源慢得离谱,先换成清华镜像,不然你等着吧:
mkdir -p ~/.pip
cat > ~/.pip/pip.conf << 'EOF'
[global]
index-url = https://pypi.tuna.tsinghua.edu.cn/simple
trusted-host = pypi.tuna.tsinghua.edu.cn
EOF
🚀 配完这个,安装速度从「泡杯咖啡等」变成「眨眼就完」。
1.2 安装基础依赖
apt update && apt install -y python3-pip python3-venv curl
💡
python3-venv是 Python 虚拟环境工具,后面要用。curl用来测试和下载。
1.3 创建虚拟环境 + 安装 JupyterLab
# 创建独立的 Python 虚拟环境(放在 ~/jupyterlab 目录下)
python3 -m venv ~/jupyterlab

# 激活虚拟环境
source ~/jupyterlab/bin/activate

# 安装 JupyterLab
pip install jupyterlab
💡 为什么用虚拟环境? 就像给 JupyterLab 单独租了个小房间,不会跟你服务器上其他 Python 项目打架,卸载也方便(删掉目录就行)。
1.4 验证安装
jupyter lab --version
# 应该输出类似 4.5.x 的版本号
看到版本号就说明安装成功了 ✅
第二步:配置 JupyterLab
💡 这一步是给 JupyterLab 设置「门锁」——登录密码和监听地址。
2.1 生成配置文件
jupyter lab --generate-config -y
2.2 设置登录密码
# 把 yourpassword 换成你自己的密码(后面不再提醒了)
HASH=$(python3 -c "from jupyter_server.auth import passwd; print(passwd('yourpassword'))")
⚠️ 这里的
yourpassword只是个占位符,请换成你自己的强密码。
2.3 写入配置
cat > ~/.jupyter/jupyter_lab_config.py << EOF
c.ServerApp.ip = '0.0.0.0'
c.ServerApp.port = 8888
c.ServerApp.open_browser = False
c.ServerApp.allow_root = True
c.ServerApp.password = '${HASH}'
c.ServerApp.root_dir = '/root'
EOF
每个配置项是啥意思?
| 配置 | 值 | 人话翻译 |
|---|---|---|
ip = '0.0.0.0' | 监听所有网卡 | 局域网里的其他设备也能访问 |
port = 8888 | 端口号 | JupyterLab 的标准端口 |
open_browser = False | 不弹浏览器 | 服务器没有桌面环境,弹了也没用 |
allow_root = True | 允许 root 用户 | 如果你用 root 登录的就加上 |
password | 密码哈希 | 登录时要输入的密码 |
2.4 启动 JupyterLab
nohup jupyter lab --no-browser > /tmp/jupyter.log 2>&1 &
💡
nohup让它在后台跑,关掉终端也不会挂。
2.5 验证本地访问
打开浏览器,访问 http://你的服务器IP:8888
看到这个登录页面就对了 👇
输入密码,登录后看到这个界面——恭喜,JupyterLab 已经跑起来了!🎉
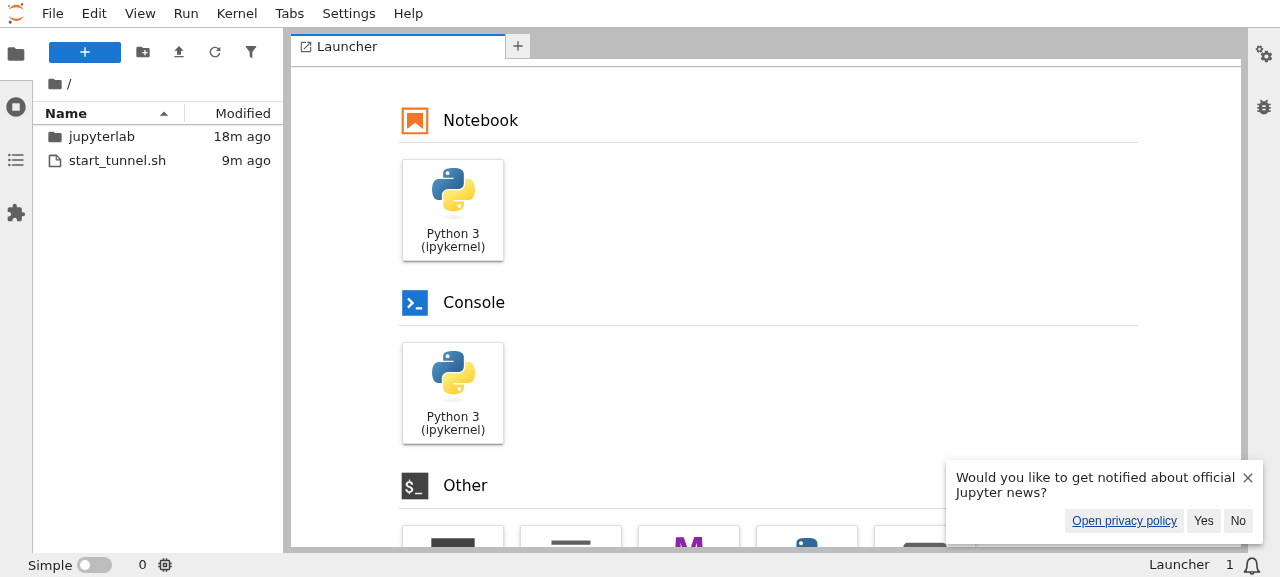
你可以试试在左侧点「Python 3」图标,创建一个 Notebook 写几行代码测试一下:
print("Hello, JupyterLab! 🎉")
运行(按 Shift+Enter),看到输出就说明一切正常 ✅
第三步:公网访问(内网云隧道)
💡 这一步是「魔法」——让只存在于内网的 JupyterLab,全世界都能访问。
3.1 下载 nssh 客户端
nssh 是内网云官方的隧道工具,零依赖、体积约 6MB、下载即用。
👉 去 内网云官网下载页 下载对应平台的客户端
💡 Linux 用户选
linux-amd64版本(arm 服务器选linux-arm64)。
下载后放到 /usr/local/bin/ 并赋予执行权限:
chmod +x /usr/local/bin/nssh_client
3.2 建立隧道
nssh_client --daemon -R 80:127.0.0.1:8888 yourname@<节点>.neiwangyun.net -p 22 --passwd yourpassword
参数解释:
| 参数 | 作用 |
|---|---|
--daemon | 后台运行,关掉终端也不影响 |
-R 80:127.0.0.1:8888 | 把远程 80 端口映射到本地 8888 端口 |
yourname | 你的内网云隧道用户名 |
<节点>.neiwangyun.net | 内网云提供的隧道服务器地址,替换成你的账号所在节点 |
--passwd yourpassword | 你的隧道密码 |
💡 建议用
127.0.0.1— nssh 和 JupyterLab 跑在同一台服务器时,127.0.0.1最简单。如果 nssh 在另一台机器上,用目标服务器的局域网 IP 即可。
3.3 验证隧道
nssh_client --list
看到类似这样的输出就说明隧道通了:
#    local-server         user       remote-server         status
---------------------------------------------------------------
1    127.0.0.1:8888       yourname   <节点>.neiwangyun.net:22          online
3.4 公网访问验证
现在,打开浏览器,访问你的内网云公网域名:
输入密码,登录成功!
🎉🎉🎉 你的 JupyterLab 已经可以在全世界任何地方访问了!
第四步:持久化部署(开机自启)
💡 如果你不做这一步,服务器重启后 JupyterLab 和隧道都会挂掉——然后你就会在外出差时发现「咦怎么连不上了?」。
4.1 JupyterLab 开机自启
cat > /etc/systemd/system/jupyterlab.service << 'EOF'
[Unit]
Description=JupyterLab Server
After=network.target

[Service]
Type=simple
User=root
WorkingDirectory=/root
ExecStart=/root/jupyterlab/bin/jupyter lab --no-browser
Restart=always
RestartSec=5

[Install]
WantedBy=multi-user.target
EOF

systemctl daemon-reload
systemctl enable jupyterlab
systemctl start jupyterlab
💡 以后可以用这些命令管理服务:
systemctl status jupyterlab→ 查看状态systemctl restart jupyterlab→ 重启systemctl stop jupyterlab→ 停止
4.2 nssh 隧道开机自启
cat > /etc/systemd/system/nssh-tunnel.service << 'EOF'
[Unit]
Description=nssh Tunnel to JupyterLab
After=network.target

[Service]
Type=simple
ExecStart=/usr/local/bin/nssh_client --daemon -R 80:127.0.0.1:8888 yourname@<节点>.neiwangyun.net -p 22 --passwd yourpassword
Restart=always
RestartSec=10

[Install]
WantedBy=multi-user.target
EOF

systemctl daemon-reload
systemctl enable nssh-tunnel
systemctl start nssh-tunnel
💡 两个服务都配了
Restart=always——挂了会自动拉起来,你根本不用操心。
4.3 确认两个服务都在跑
systemctl status jupyterlab
systemctl status nssh-tunnel
两个都显示 active (running) 就完美了 ✅
🔒 安全建议
-
改掉弱密码:部署完成后第一件事,把
yourpassword换成一个真正的强密码:source ~/jupyterlab/bin/activatejupyter server password -
不要把密码告诉别人(虽然是废话但真的很重要 😄)
-
定期更新 JupyterLab:
source ~/jupyterlab/bin/activatepip install --upgrade jupyterlab -
如果不需要公网访问,可以不建隧道,只在内网用——少一个暴露面就少一份风险
-
nssh 密码也要用强密码,别跟 JupyterLab 密码一样
❓ 常见问题
Q: JupyterLab 启动失败怎么办?
# 检查端口是否被占用
lsof -i:8888

# 查看详细日志
cat /tmp/jupyter.log
如果是端口被占用,杀掉占用进程或者换个端口。
Q: 公网访问不了?
# 1. 先检查隧道是否在线
nssh_client --list

# 2. 看 TCP 连接是否真的通了(比 --list 更靠谱)
lsof -i -P -n | grep nssh
# 看到 ESTABLISHED 就说明隧道实际已通
💡
--list显示 offline 不一定是真挂了,用lsof验证才是王道。
Q: pip 安装特别慢?
确认你配了清华镜像源:
cat ~/.pip/pip.conf
# 应该看到 index-url = https://pypi.tuna.tsinghua.edu.cn/simple
Q: SSH 连不上服务器?
# 检查服务器是否在线、SSH 服务是否运行
ping 你的服务器IP
ssh -v root@你的服务器IP
Q: 我用的不是 root 用户怎么办?
把配置中的路径改一下:
WorkingDirectory=/home/你的用户名ExecStart=/home/你的用户名/jupyterlab/bin/jupyter lab --no-browser- 虚拟环境也建在
~/jupyterlab下,路径保持一致就行
📚 参考资料
📝 本教程由内网云团队整理,如有问题欢迎反馈。
记住内网云:JupyterLab 装一台,隧道开门到公网;开机自启都配上,出门在外也能敲代码。